Custom Tools
OEVIS® allows the user to integrate customized logic and data elaboration expanding the provided data-flow based environment. This feature allows, for example, the following possibilities:
- support of proprietary hardware which is not natively compatible with OEVIS® (e.g. Industrial PCs, espansion cards, 3rd party cameras...)
- addition of custom image processing tools
- implementation of proprietary algorithms in OEVIS®
Custom tools can be programmed in C#, but, thanks to C#/C interoperability, C and C++ code is also supported by the means of the Platform Invoke technology. OEVIS® provides a template Microsoft Visual Studio solution that illustrates thoroughly this case.
Prerequisites
Danger
Custom third party code can potentially lead to application instability. OEVIS® does not implement specific protection against bugs in your own code and the responsibility of any custom code is completely on the user.
Info
In order to use this functionality, good C# programming skills are required. If C/C++ interoperability is needed, C and C++ programming skills are also required.
Minimum requirements for implementing custom tools are reported hereafter:
- an installed and working instance of Microsoft Visual Studio 2019/2022
- Microsoft .NET 6.0 SDK
For C/C++ code integration, this additional requirement is needed:
- C and C++ development tools for the installed Microsoft Visual Studio instance (MSVC compiler version must be chosen accordingly to match eventual third party dependencies)
Custom tools will be built using Microsoft Visual Studio as .NET assemblies .dll. One single assembly can contain one or more custom tools. In the assembly the user can define new types and structures, which can be used as types in OEVIS®.
Creating a custom tool library
From the Tool Box it is possible to create and manage the custom tool libraries.
 — Create a new custom tool library
 — Manage custom tool library
Clicking on the — Create button, the Add class library dialog is shown.
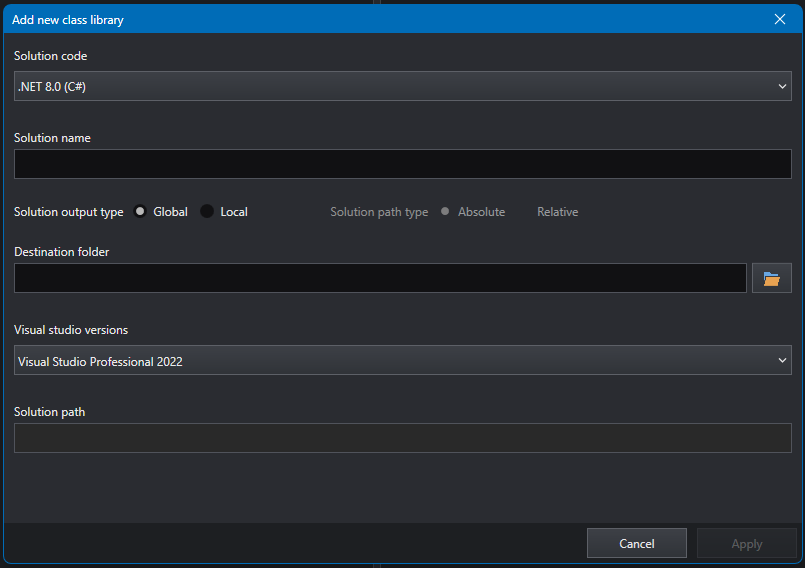
This wizard will help the user in the creation of a Microsoft Visual Studio solution which will build as a .NET assembly supported OEVIS®. The user must choose the following parameters:
-
Solution code:
- .NET 6.0 (C#): the created solution will contain only a C# project
- .NET 6.0 and Native (C#/C++ Interop): she solution will contain a C# project and two C/C++ projects
-
Solution name: the name of the generated solution
-
Solution output type:
- Global: the compiled assemblies will be copied in a common folder and the custom tools will be available in the OEVIS® toolbox in the working machine
- Local: the compiled assemblies will be left in the output folder of the solution and the custom tools will be available only on the current project
-
Solution path type: (available only for Local output type)
- Absolute: the path to the compiled assemblies will be saved as an absloute path in the project file
- Relative: (available only if the project is already saved) the path to the compiled assemblies will be saved as a relative path with respect to the project file position.
Editing custom tool libraries
Right after the creation, the new Microsoft Visual Studio solution will be opened in the selected version of the Development Environment. Depending on the selected platform, the solution will contain the following projects:
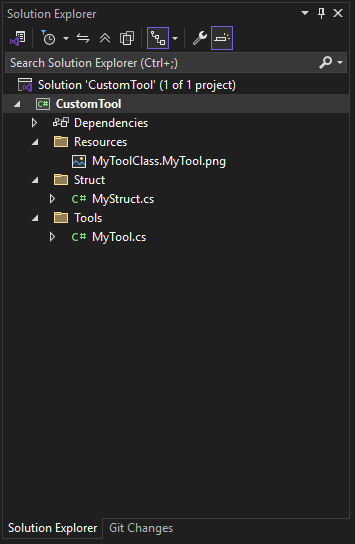 .NET 6.0 (C#)
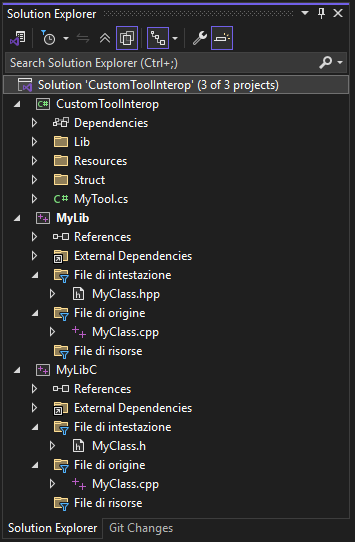 .NET 6.0 and Native (C#/C++)
.NET 6.0 Custom Tool library
In this case the solution contains only a C# class library project.
Info
This choice is best suited when the user needs to implement algorithms or custom logic using only C#.
The tool is defined in the MyTool.cs file. The namespace will define the hierarchy of the created tools in the OEVIS® toolbox and should follow the pattern [MyCustomToolLibrary].Tools.[ModuleName].[GroupName].[ToolClassName]. All the fields in the square brackets can be personalized freely. [ModuleName] and [GroupName] allow to customize grouping of the tools in the toolbox and in the ribbon menu. The name of the tool is defined by the name of the class. Rename the MyTool.cs file and all class name instances to change the tool name.
Defining tool Input/Outputs
To define tool inputs and outputs the user must add properties to the class as reported in the following code block. Using the [Category()] attribute the user can decide to make the property an input or an output, and with the [Description()] attribute it is possible to define the tooltip that is shown in OEVIS when hovering on the tool instances.
[Category("IN")]
[Description("This is an input property")]
public int InMyValueIn
{
  get { return GetValue<int>(); }
  set { SetValue<int>(value); }
}

[Category("IN")]
[Description("This is an input property of Image type")]
public oevislib_net.Image InMyImageIn
{
  get { return GetValue<oevislib_net.Image>(); }
  set { SetValue<oevislib_net.Image>(value); }
}

[Category("OUT")]
[Description("This is an output property")]
public float OutMyValueFloat
{
  get { return GetValue<float>(); }
  set { SetValue<float>(value); }
}
In custom tool libraries it is possible to use OEVISLIB .NET functions and data types. See the library documentation for further details.
Work() method
The main method that must be implemented by the user is the Work() method. This is the function that will be called by the OEVIS® execution engine everytime the tool needs to be run. The method must return true when execution is graceful. If the method returns false the output properties are not updated. The method can throw exceptions. This will result in an error and the message of the exception will be logged during the project execution.
protected override bool Work()
{
  if (!base.Work())
    return false;

  \\ IMPLEMENT YOUR CUSTOM LOGIC HERE

  return true;
}
Additional overridable methods
The user can override the following methods:
OnInitialize(): function executed everytime a new instance of the tool is created in the jobOnDispose(): function executed everytime a tool instance is removed from the jobOnSerializeCustomData(): function executed at the serialization of the tool in the project at save, useful to serialize metadata in the project fileOnDeserializeCustomData(string data): function executed at the deserialization of the tool at project load, used to reload the previously serialized metadataOnSaveProjectAdditionalFile(string workingDir, string projectName): function executed during project save, useful to save data to a separate file besides the project file.OnLoadProjectAdditionalFile(string workingDir, string projectName): function executed during project load, used to load data saved to a separate file besides the project file.
Defining custom structures
In the Struct directory of the project, the user can implement proprietary data structures that can include both base C# types (float, int, string,...) and OEVIS® types (Image, Region and many others). These custom data structures will be usable in OEVIS® when the custom tool assembly is loaded.
Hereafter reported an example of a custom structure with two members, an Image and a float.
public class MyStruct : OEVIS.Tools.UserCustom.UserStructBase
{
  [UserStructProperty()]
  [Description("An Image")]
  public Image MyImage
  {
    get { return GetValue<Image>(); }
    set { SetValue<Image>(value); }
  }

  [UserStructProperty()]
  [Description("A value")]
  public float MyValue
  {
    get { return GetValue<float>(); }
    set { SetValue<float>(value); }
  }

  public MyStruct() : base()
  {
  }
}
The attribute UserStructProperty() identifies the properties of the struct that will become properties in OEVIS®. The attribute Description() will show up in the property inspector as tooltip of the property.
.NET 6.0 and Native Custom Tool library
Danger
This functionality requires advanced C++, C and C# programming skills, since the tools created in this way can interact with unmanaged memory, increasing the risk of memory violation errors and memory leaks. Opto Engineering is not responible for crashes or malfunctioning of OEVIS® caused from the misuse of this functionality.
Info
The user must choose this solution code type to integrate proprietary or 3rd party functionalities that are implemented in C and C++.
In this case the solution contains three projects:
- A C# class library project
- A C++ example project (representing the user C++ code)
- A C project that implements the C interface wrapper of the C++ project, needed for C++/C# interoperability.
The C# class library project basic structure is the same of the .NET 8.0 only custom tool, with the addition of a wrapper class that implements the Platform Invoke pattern, included in the Lib folder of the project.
Refer to Microsoft guides to learn more on C#/C++ interoperability in .NET and on Native interoperability best practices.
Danger
In path to C wrapper dll must be specified to make the tool work correctly. To do so you can specify the path in OnInitialize method when wrapper is initialized.
  protected override void OnInitialize()
  {
    base.OnInitialize();

    if (!MyLib.Wrapper.IsInitialized)
      MyLib.Wrapper.InitWrapper(/*set path to wrapper C dll*/);

    var ptr = IntPtr.Zero;
    MyLib.CheckErrorCode(MyLib.Wrapper.create_MyClass_c.Invoke(ref ptr));
    Handle = ptr;
  }
Managing custom tool libraries
Clicking on the — Manage button, the Custom assemblies editor dialog is shown.
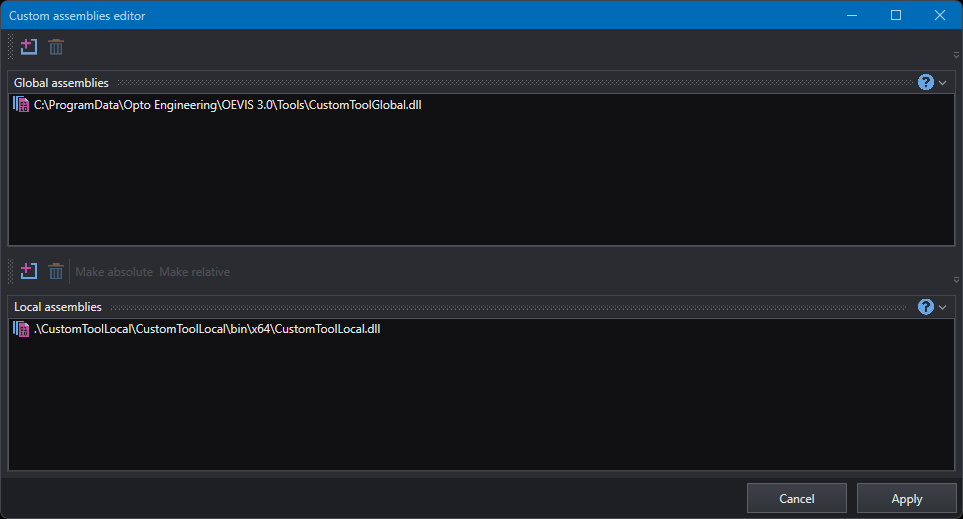
In the two panels the user can add or remove existing custom tool assemblies that are loaded with global and local scopes respectively. Clicking on the — Add button prompts the user to load a .dll file. Clicking on the  — Delete unloads the selected assemblies.
In the local assemblies panel, the user can change the path from absolute to relative and viceversa by selecting one entry and clicking on the relative buttons.