Custom HMI
OEVIS® allows the user to integrate customized logic and data elaboration expanding the provided data-flow based environment. This feature allows, for example, the following possibilities:
- support of proprietary hardware which is not natively compatible with OEVIS® (e.g. Industrial PCs, espansion cards, 3rd party cameras...)
- addition of custom image processing tools
- implementation of proprietary algorithms in OEVIS®
Custom HMI can be programmed in C#. OEVIS® provides a template Microsoft Visual Studio solution that illustrates thoroughly this case.
Prerequisites
Danger
Custom third party code can potentially lead to application instability. OEVIS® does not implement specific protection against bugs in your own code and the responsibility of any custom code is completely on the user.
Info
In order to use this functionality, good C# programming skills are required.
Minimum requirements for implementing custom tools are reported hereafter:
- an installed and working instance of Microsoft Visual Studio 2019/2022
- Microsoft .NET 6.0 SDK
Custom HMI will be built using Microsoft Visual Studio as .NET assemblies .dll. One single assembly can contain one or more custom tools. In the assembly the user can define new types and structures, which can be used as types in OEVIS®.
Creating a custom HMI library
From the Tool Box it is possible to create and manage the custom HMI libraries.
 — Create a new custom HMI library
 — Manage custom HMI library
Clicking on the — Create button, the Add WPF class library dialog is shown.
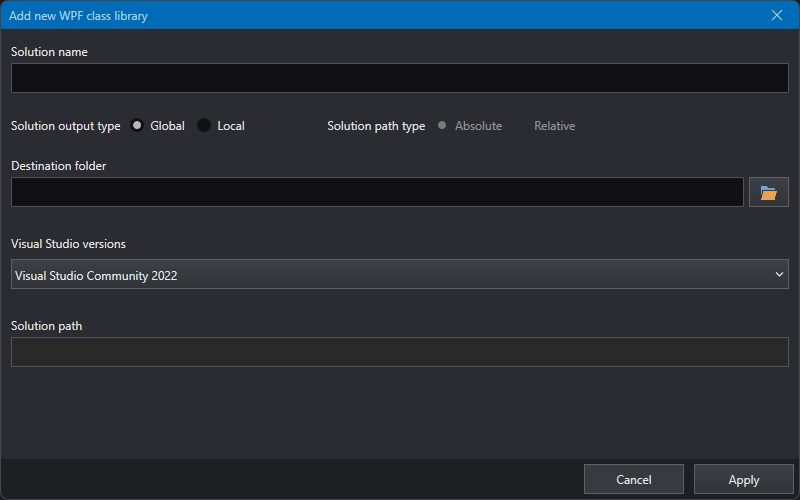
This wizard will help the user in the creation of a Microsoft Visual Studio solution which will build as a .NET assembly supported OEVIS®. The user must choose the following parameters:
- Solution name: the name of the generated solution
-
Solution output type:
- Global: the compiled assemblies will be copied in a common folder and the custom tools will be available in the OEVIS® toolbox in the working machine
- Local: the compiled assemblies will be left in the output folder of the solution and the custom tools will be available only on the current project
-
Solution path type: (available only for Local output type)
- Absolute: the path to the compiled assemblies will be saved as an absloute path in the project file
- Relative: (available only if the project is already saved) the path to the compiled assemblies will be saved as a relative path with respect to the project file position.
Editing custom HMI libraries
Right after the creation, the new Microsoft Visual Studio solution will be opened in the selected version of the Development Environment.
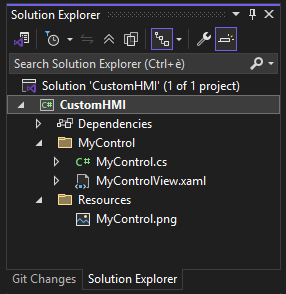
.NET 6.0 Custom HMI library
Compare to custom tools the solution contains only a C# class library project.
The control is defined in the MyControl.cs file. The namespace will define the hierarchy of the created control in the OEVIS® toolbox and should follow the pattern [MyWpfLibrary].[MyGroupControlsName]. All the fields in the square brackets can be personalized freely. [MyGroupControlsName] allow to customize grouping of the control in the toolbox and in the ribbon menu. The name of the control is defined by the name of the class. Rename the MyControl.cs file and all class name instances to change the control name.
Defining custom properties
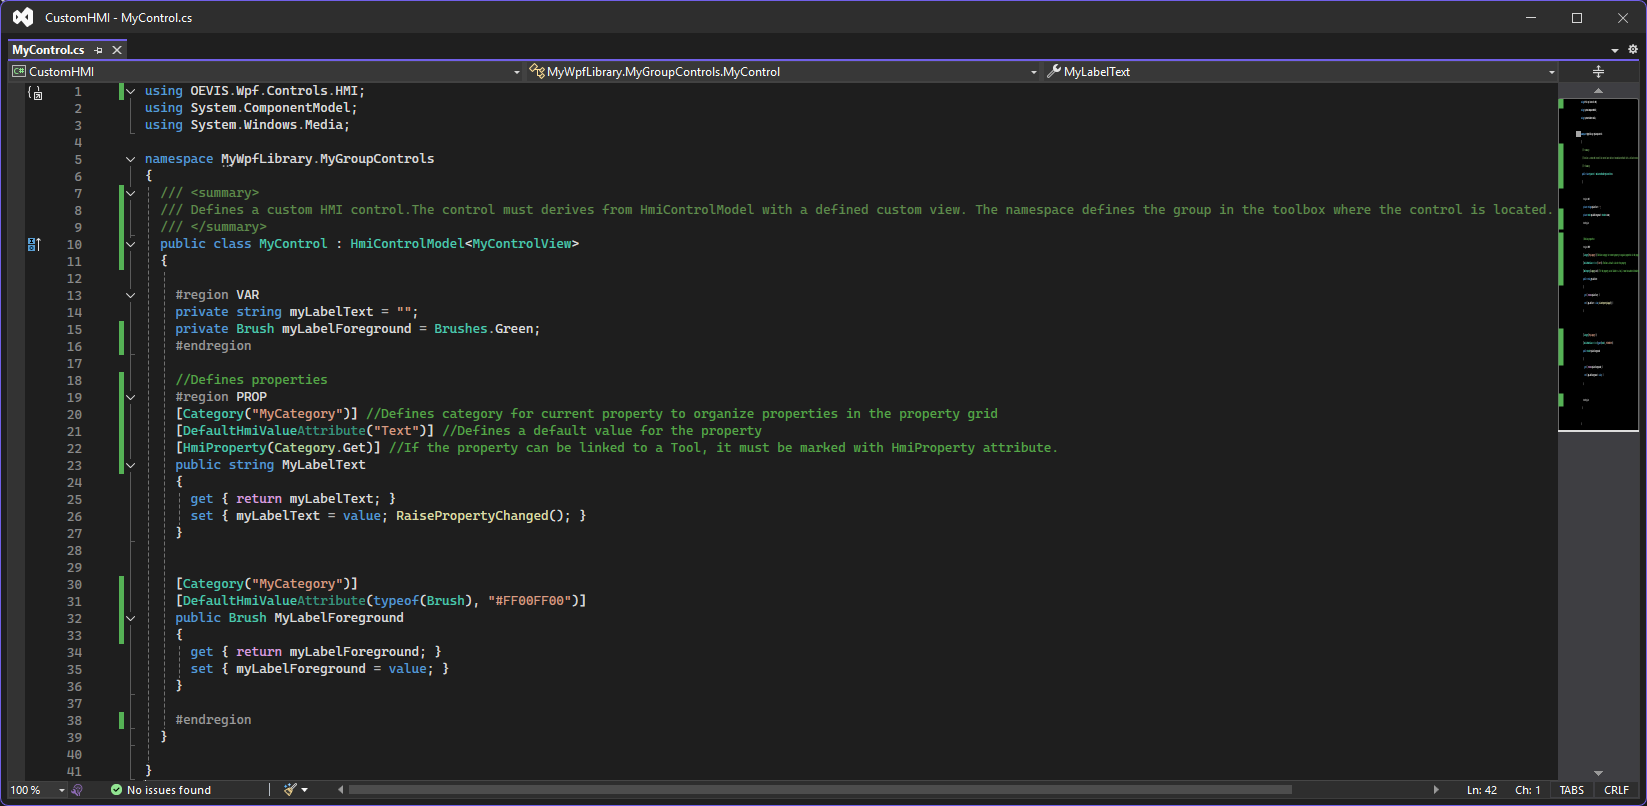
public class MyControl : HmiControlModel<MyControlView>
{

    #region VAR
    private string myLabelText = "";
    private Brush myLabelForeground = Brushes.Green;
    #endregion

    //Defines properties
    #region PROP
   //Defines category for current property to organize properties in the property grid
    [Category("MyCategory")]
   //Defines a default value for the property
    [DefaultHmiValueAttribute("Text")]
   //If the property can be linked to a Tool, it must be marked with HmiProperty attribute.
    [HmiProperty(Category.Get)]
    public string MyLabelText
    {
        get { return myLabelText; }
        set { myLabelText = value; RaisePropertyChanged(); }
    }


    [Category("MyCategory")]
    [DefaultHmiValueAttribute(typeof(Brush), "#FF00FF00")]
    public Brush MyLabelForeground
    {
        get { return myLabelForeground; }
        set { myLabelForeground = value; }
    }

    #endregion
}
In the example, the class MyControl is inherited from HmiControlModel which is the base class for all HMI controls available in HMI Toolbox. MyControlView is the designed control that is loaded when MyControl is created in HMI; in the .xaml is possible to style the control using bindings, converters like any other WPF element.
<UserControl x:Class="MyWpfLibrary.MyGroupControls.MyControlView"
             xmlns="http://schemas.microsoft.com/winfx/2006/xaml/presentation"
             xmlns:x="http://schemas.microsoft.com/winfx/2006/xaml"
             xmlns:mc="http://schemas.openxmlformats.org/markup-compatibility/2006"
             xmlns:d="http://schemas.microsoft.com/expression/blend/2008"
             xmlns:local="clr-namespace:MyWpfLibrary.MyGroupControls"
             d:DataContext="{d:DesignInstance Type={x:Type local:MyControl}}"
             mc:Ignorable="d"
             d:DesignHeight="450"
             d:DesignWidth="800">
  <Grid>
    <Label Content="{Binding MyLabelText}"
           Foreground="{Binding MyLabelForeground}" />
  </Grid>
</UserControl>
The attribute HmiProperty allows to define if a property should be visible in the control to be linked to other properties in the Job; the attribute value Category is a bitmask and can be set in the following ways:
HmiProperty(Category.Get): the property is displayed as input for the control (it can be linked to tool OUT properties).HmiProperty(Category.Set): the property is displayed as output for the control (it can be linked to tool IN properties).HmiProperty(Category.Get|Category.Set): the property is displayed both as input and output for the control (it can be linked to tool IN and OUT properties).
In custom HMI controls libraries it is possible to use OEVISLIB .NET functions and data types. See the library documentation for further details.
Managing custom HMI libraries
Clicking on the — Manage button, the Custom assemblies editor dialog is shown.
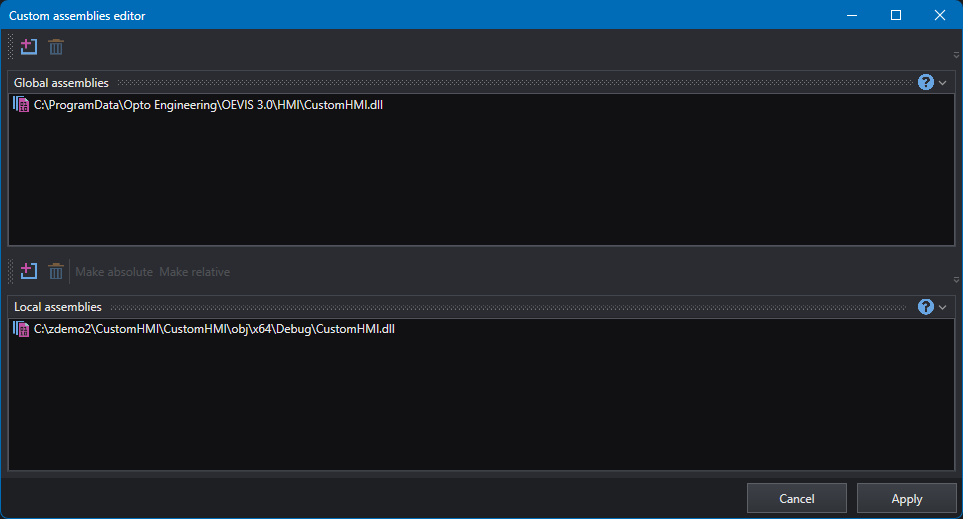
In the two panels the user can add or remove existing custom HMI assemblies that are loaded with global and local scopes respectively. Clicking on the — Add button prompts the user to load a .dll file. Clicking on the  — Delete unloads the selected assemblies.
In the local assemblies panel, the user can change the path from absolute to relative and viceversa by selecting one entry and clicking on the relative buttons.